¶ RM Racing Electronics CAN-BUS Display Gauge
The Round CAN Display Gauge is a 52 mm instrument that reads your ECU or
ZF 8hp gearbox controller directly off the CAN bus and shows any of its channels on a
round screen. There are seven pages, and every data box on them is
something you choose — nothing is hard-wired to a fixed sensor.
Everything is configured from the free Android app over Bluetooth. There are no
buttons to hold, no menus to count clicks through, and no need to take the gauge
out of the dash to change what it displays.
¶ 1) What it does
| Display | 1.85" round IPS, 360 × 360 |
| Bus | CAN 2.0A / 2.0B, 50 k to 1 M baud (500 k default) |
| Termination | 120 Ω resistor built in, switchable in software |
| Supply | 12 V automotive, switched (ignition or accessory) |
| Protocols | RM-Primis, MaxxECU, OBDII, plus 4 slots for your own DBC file |
| Configuration | Android app over Bluetooth LE |
| Firmware updates | Over Bluetooth, from a Windows PC, no cables |
Downloads — Android app (APK) · Firmware updater for Windows
¶ 2) Connections and pinout
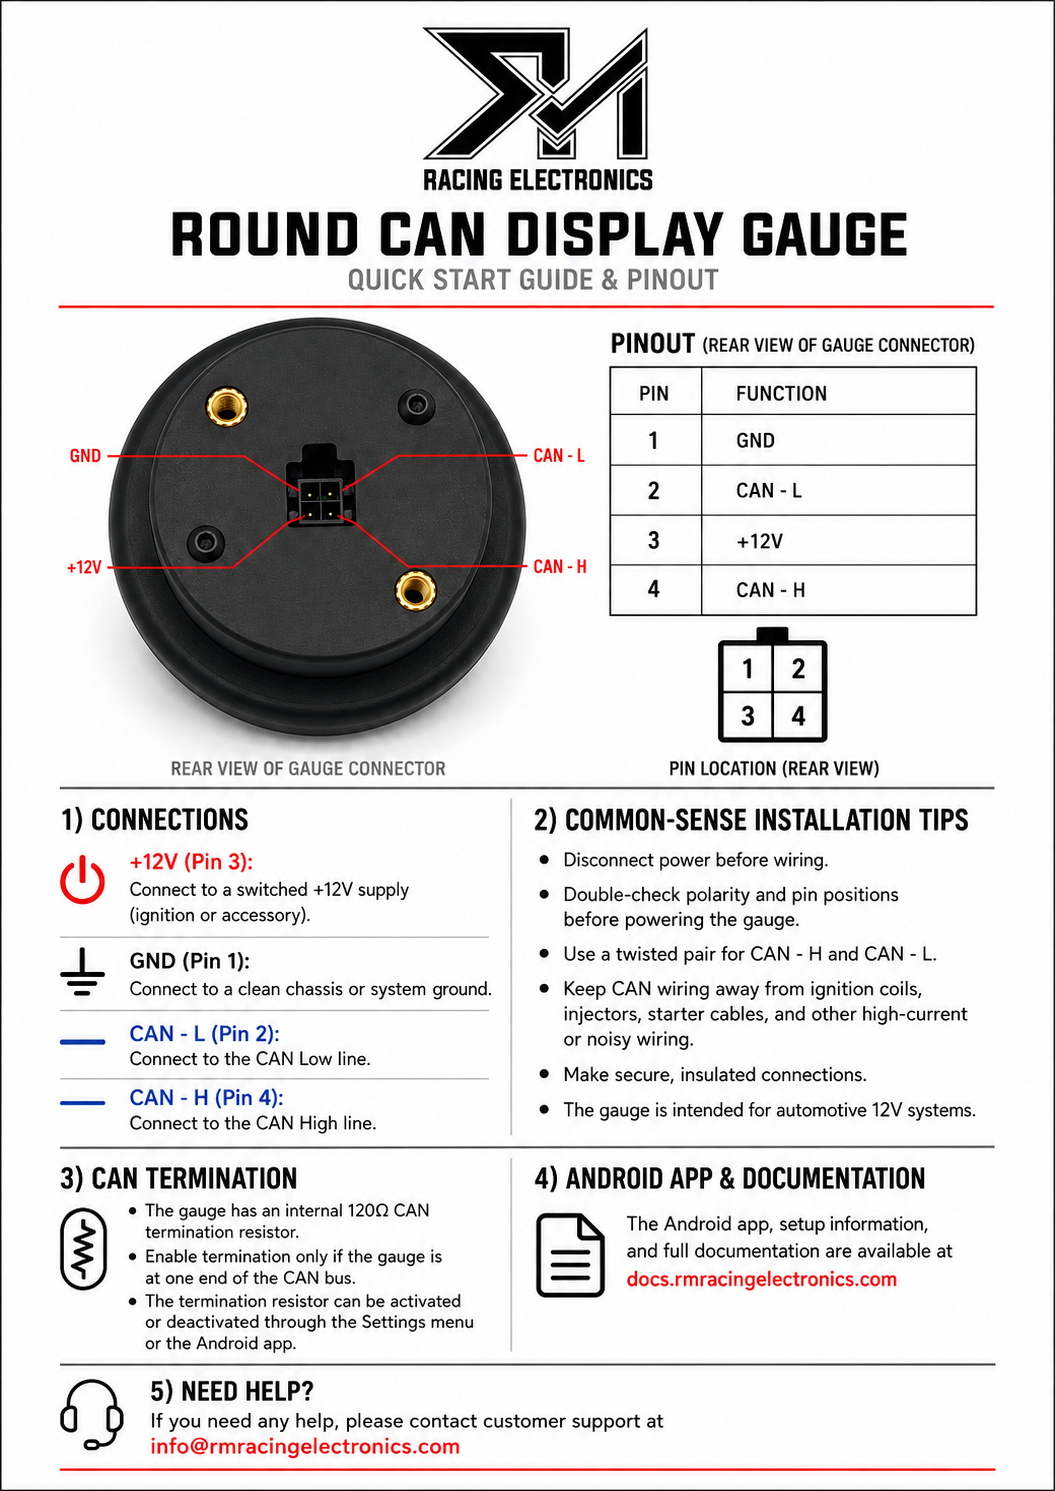
The gauge uses a single 4-way connector on the back.
| Pin | Function | Connect to |
|---|---|---|
| 1 | GND | A clean chassis or system ground |
| 2 | CAN‑L | The CAN Low line |
| 3 | +12 V | A switched +12 V supply (ignition or accessory) |
| 4 | CAN‑H | The CAN High line |
Pin positions are shown from the rear of the gauge — the side you plug into.
Looking at the back of the gauge, pins 1 and 2 are the top row and pins 3 and 4
are the bottom row.
¶ Installation notes
- Disconnect power before wiring.
- Double-check polarity and pin positions before powering the gauge. +12 V is
pin 3, not pin 1. - Use a twisted pair for CAN‑H and CAN‑L. This is what makes CAN immune to
electrical noise; running the two wires separately throws that away. - Keep CAN wiring away from ignition coils, injectors, starter cables and any
other high-current or noisy wiring. - Make secure, insulated connections. A CAN line that goes intermittent at
20 Hz is far harder to diagnose than one that never worked. - The gauge is intended for 12 V automotive systems.
¶ 3) CAN termination
A CAN bus needs exactly two 120 Ω terminating resistors — one at each end of
the backbone. The gauge has one built in.
Enable termination only if the gauge is at one end of the bus.
If you are tapping into the middle of an existing, already-terminated bus (which
is the usual case when connecting to a factory or ECU harness), leave it
off. Adding a third resistor drops the bus impedance and can stop
communication entirely.
Termination is switched in software — there is no jumper to reach:
- On the gauge: Settings → CAN termination
- In the app: Settings → CAN termination resistor
¶ 4) First power-up
- With the gauge wired and the ignition on, the RM Racing Electronics logo
appears while the gauge starts up, then it goes to the first screen. - Swipe left and right to move between the seven screens.
- Go to the last screen, Settings, and set your Protocol and CAN baud
rate to match your ECU. Almost everything else follows from these two. - Check Screen 6 (CAN Monitor). If frames are arriving, you are connected —
see Screen 6 for how to read it.
If nothing arrives, see Troubleshooting.
¶ 5) The screens
Swipe left and right to page between screens. A row of dots at the bottom of
each screen shows where you are.
On screens 1 to 5, tap any data box to change what it displays without
reaching for your phone. The same choice can be made from the app, where the
full list of channels is easier to read.
¶ At a glance
| Screen | What it is | Configurable fields |
|---|---|---|
| 1 | Gear and tachometer | 2 |
| 2 | Gear, large | 3 |
| 3 | Engine | RPM + 6 |
| 4 | Temperatures | 5 |
| 5 | Performance | 6 |
| 6 | CAN Monitor — diagnostics | — |
| 7 | Settings | — |
¶ Screen 1 — Gear and tachometer
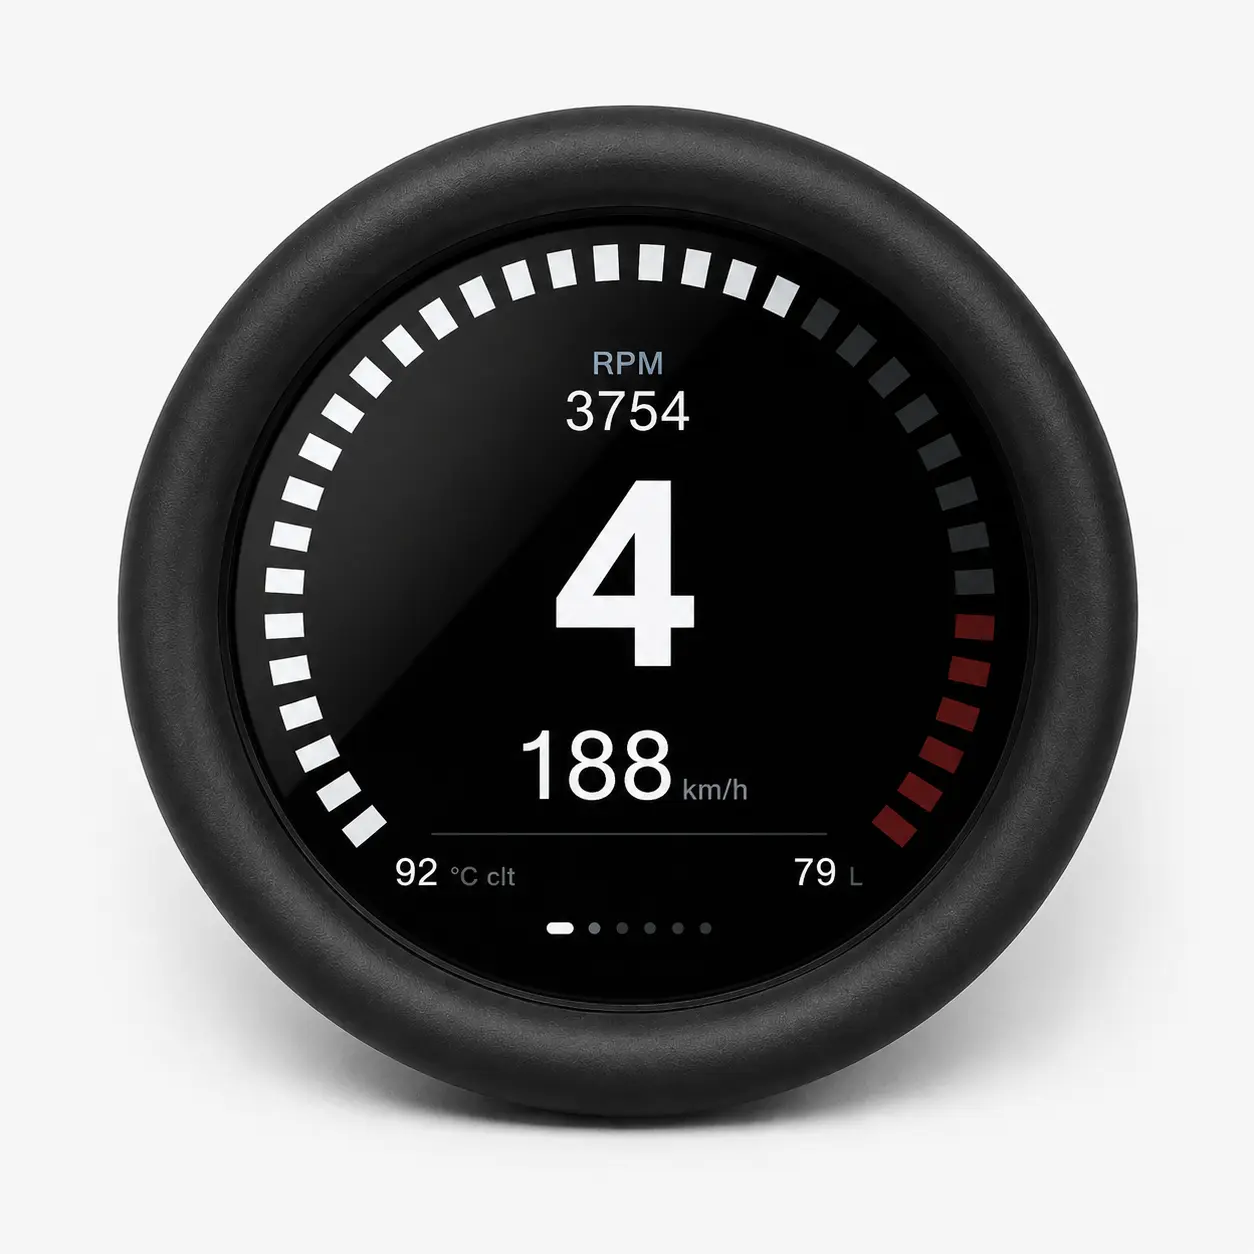
The main driving screen. A segmented RPM ring runs around the outside of the
glass with the current gear in the centre, and two configurable fields below it.
The last segments of the ring are the redline: they are drawn thicker as
well as red, so the limit reads as a shape and not only as a colour — it still
works in peripheral vision and for colour-blind drivers. The ring is scaled to
9000 rpm, with the redline band starting around 7600 rpm.
This is also the screen the shift alert flashes.
Configurable fields: 2 (default: speed, fuel consumption)
¶ Screen 2 — Gear, large
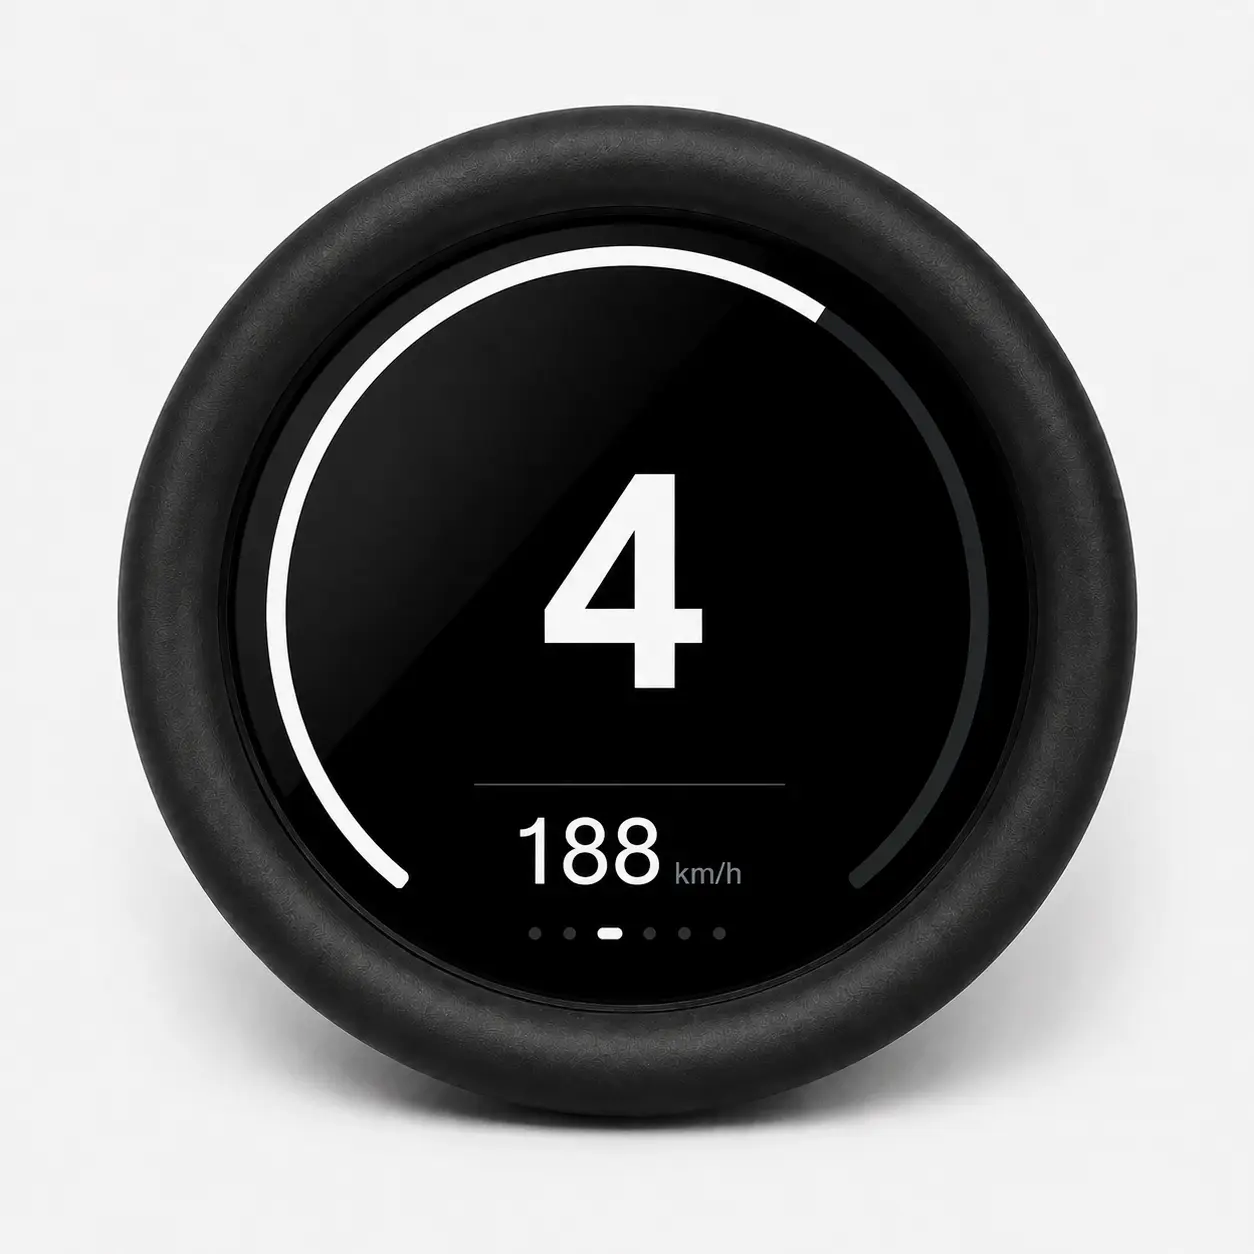
The same information with the gear as large as the glass allows, a continuous
outer arc instead of segments, and three fields beneath: speed, shifter
position, and drive mode.
On a supported gearbox, the shifter field reads P, R, N, D,
M or S, and the drive mode field reads Eco Pro, Confort,
Sport or Sport+. With an 8HP box in a sport programme, the lever still
reports D but the box is behaving as S — the gauge shows S, because that is
what the car is actually doing.
Configurable fields: 3 (default: speed, shifter position, drive mode)
¶ Screen 3 — Engine
RPM across the top, then a six-field grid.
Configurable fields: RPM + 6 (default: MAP, lambda, boost target, IAT,
battery, TPS)
¶ Screen 4 — Temperatures
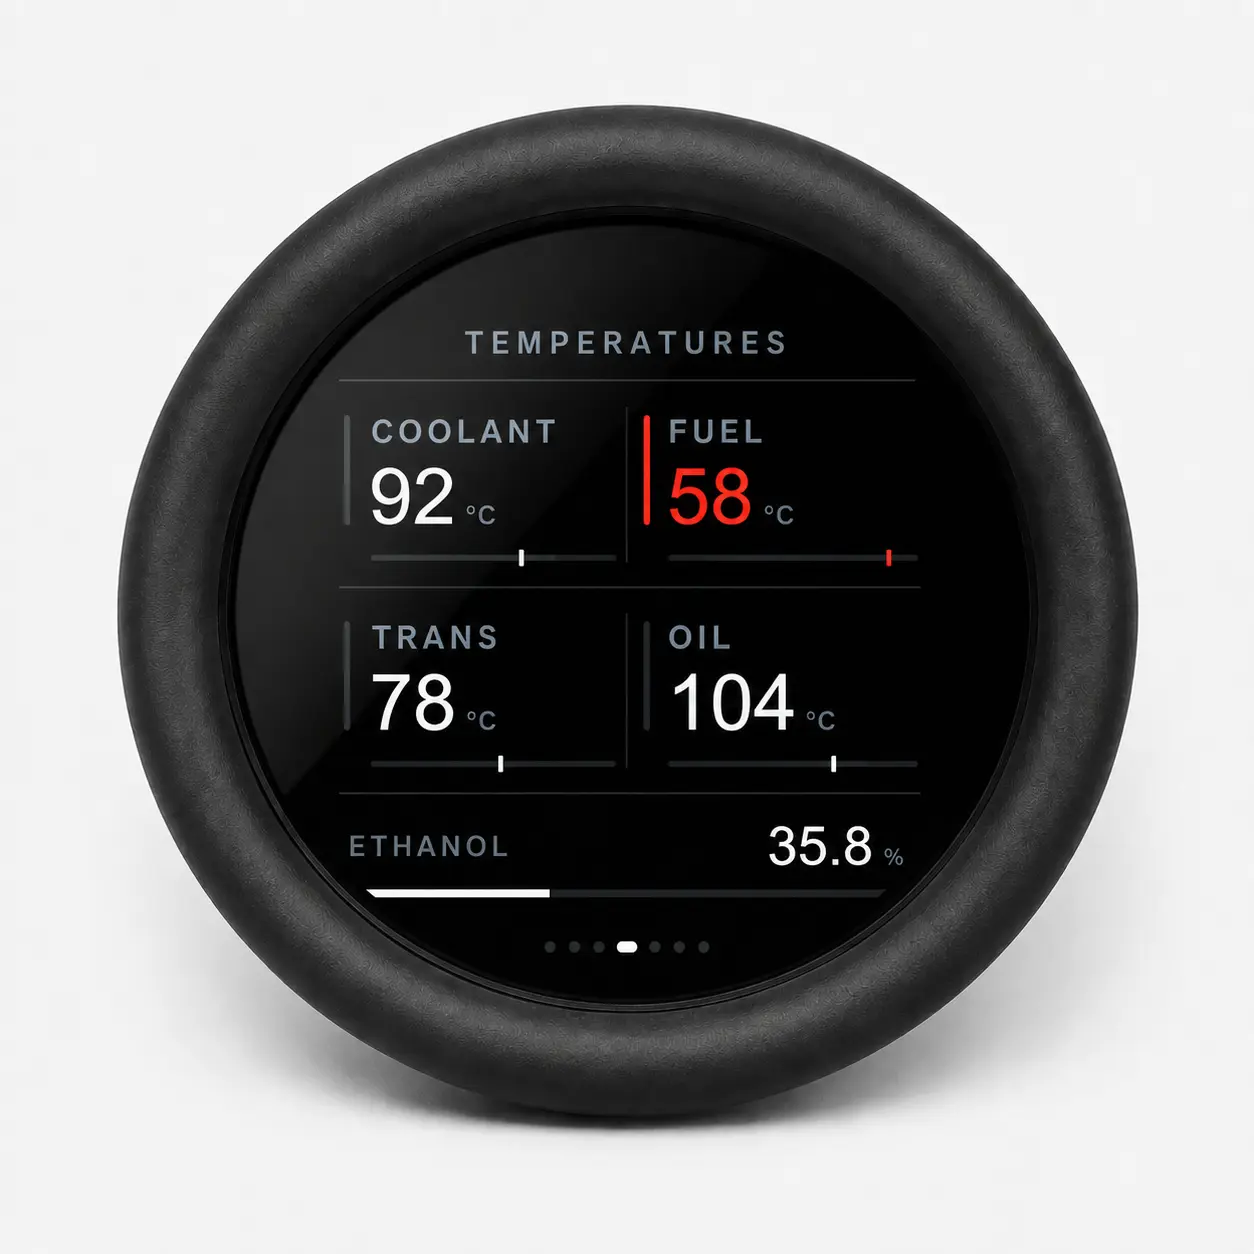
Five configurable fields in the same visual language as screen 3.
Configurable fields: 5 (default: coolant, fuel temp, transmission temp,
torque, ethanol)
¶ Screen 5 — Performance
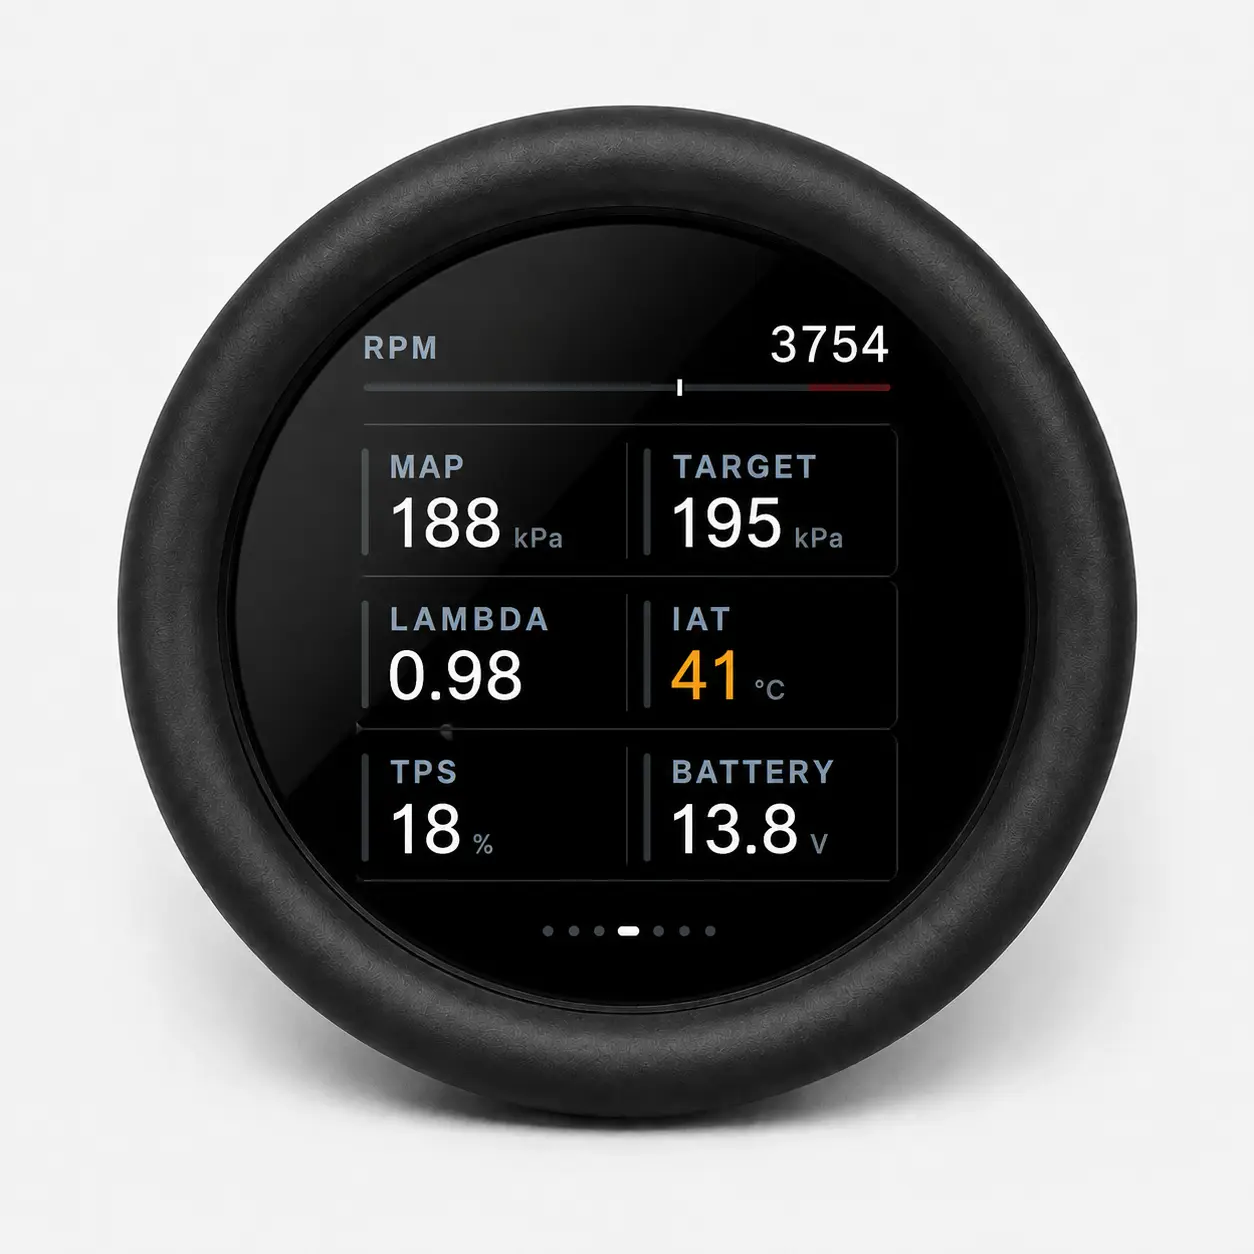
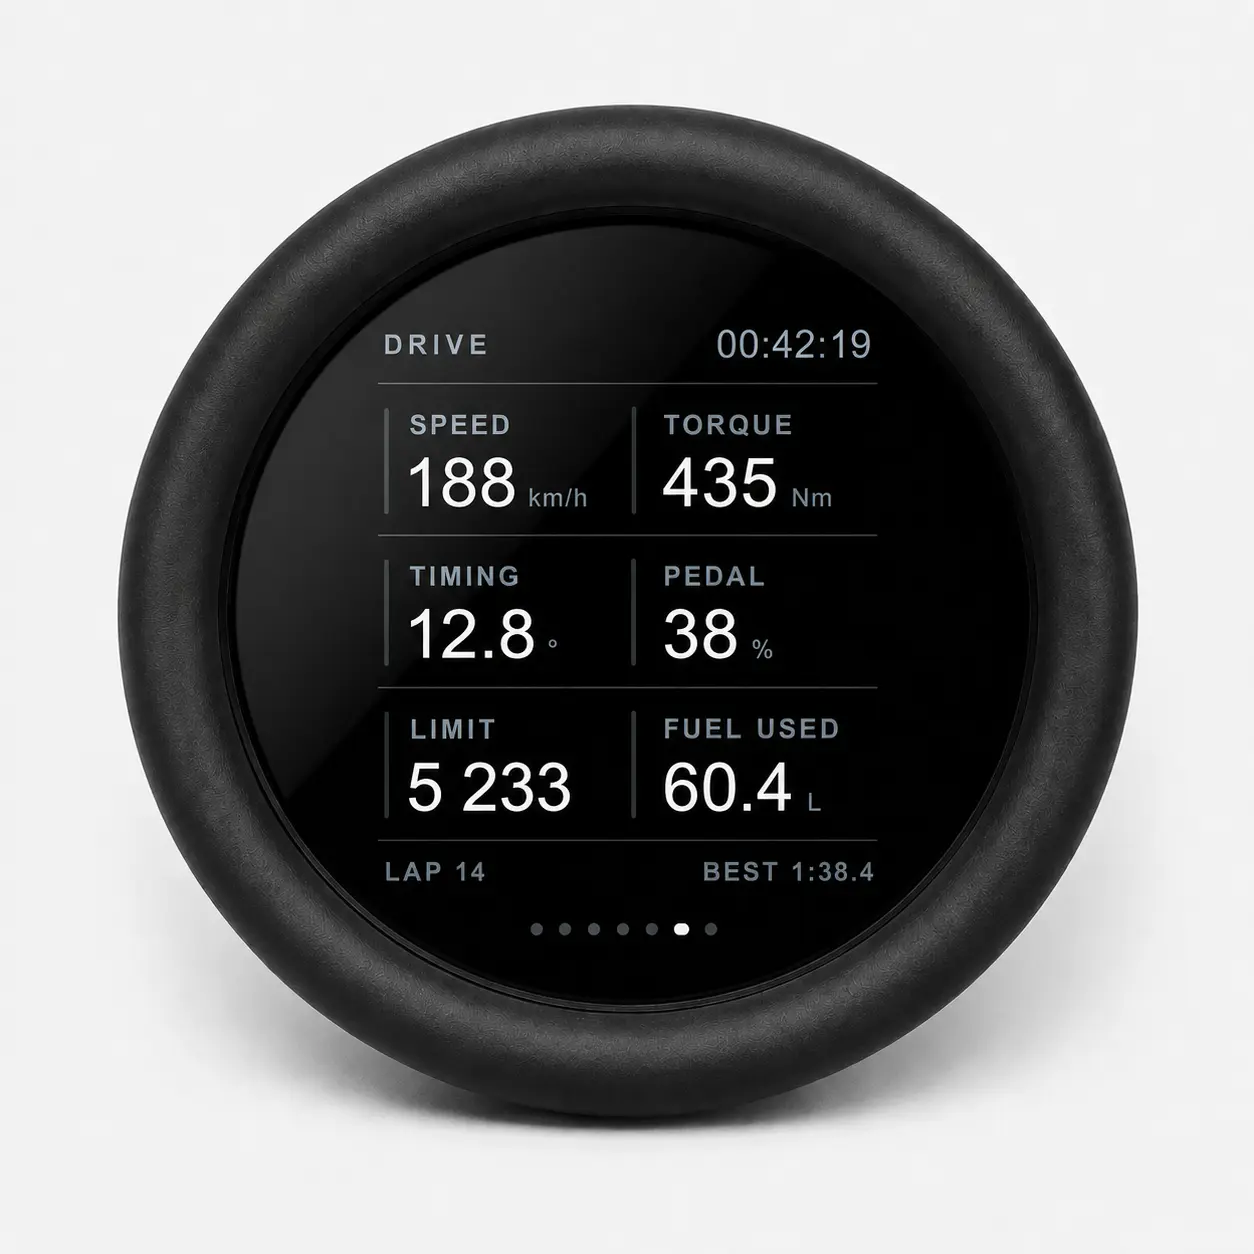
A second six-field grid, laid out identically to screen 3 so that paging between
them feels like turning a page rather than entering a different product.
Configurable fields: 6 (default: speed, torque, rev limit, fuel used,
ignition timing, pedal)
¶ Screen 6 — CAN Monitor
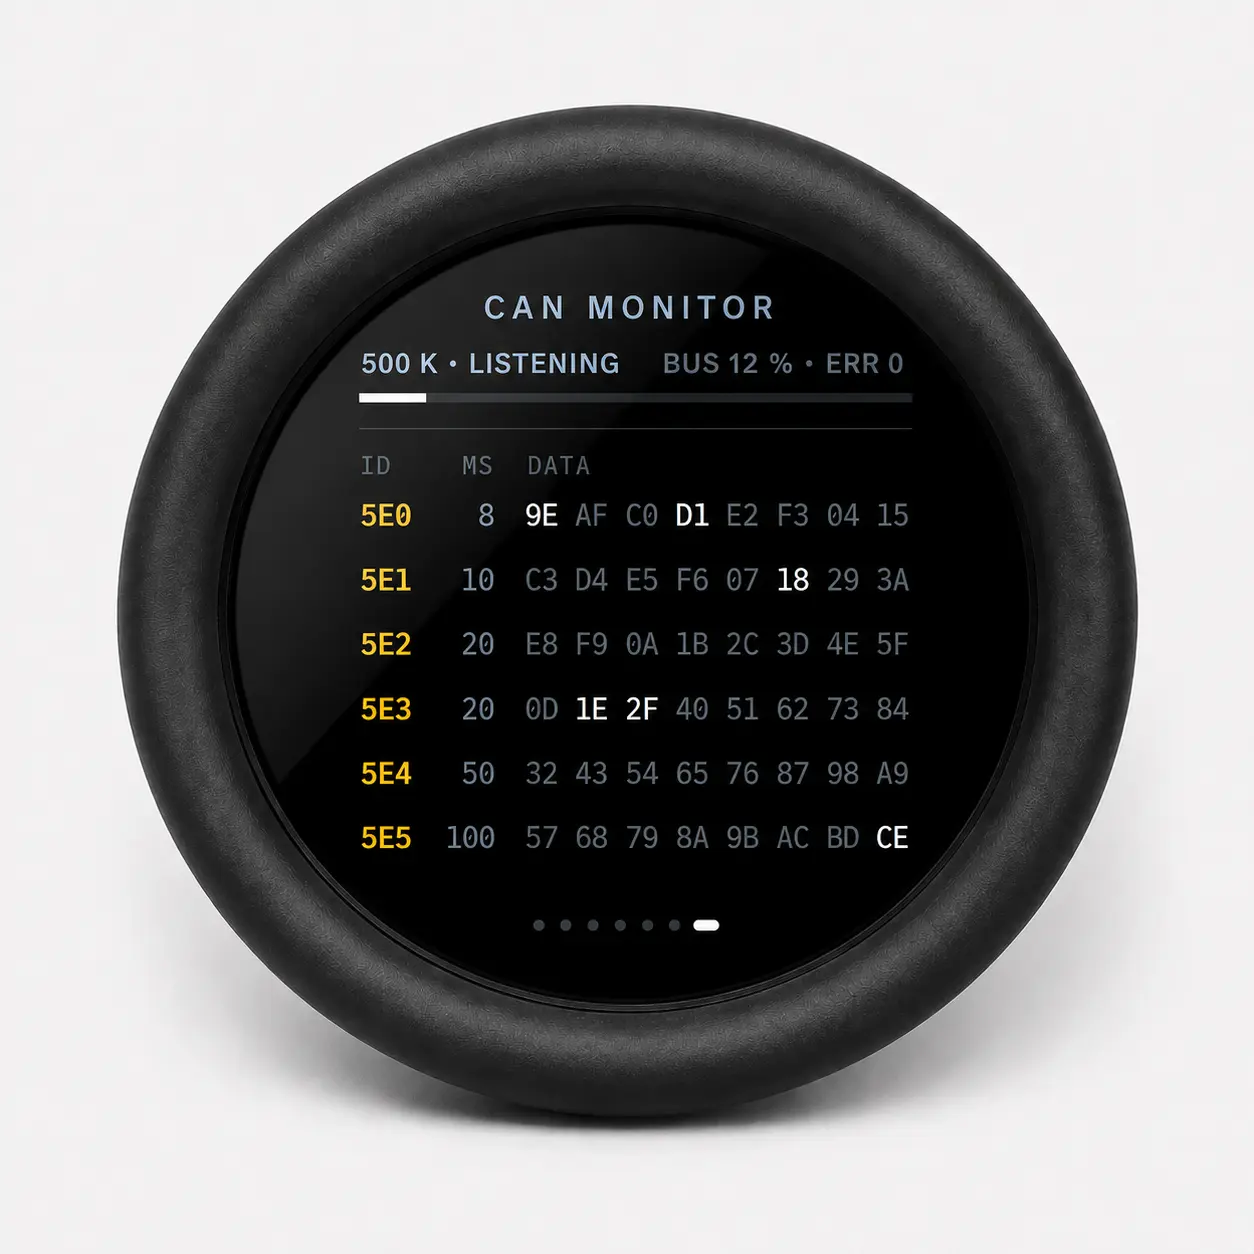
A diagnostic view. Nothing here is configurable — it tells you what is actually
on the wire:
- Bus speed and state (top left) and error count (top right)
- Bus load bar underneath
- A live list of CAN IDs with their data bytes; bytes flash as they change
This is the screen to use when a channel is not appearing. If IDs are listed
here, the wiring and baud rate are correct and the problem is protocol or
channel selection. If the list is empty, the problem is upstream.
¶ Screen 7 — Settings
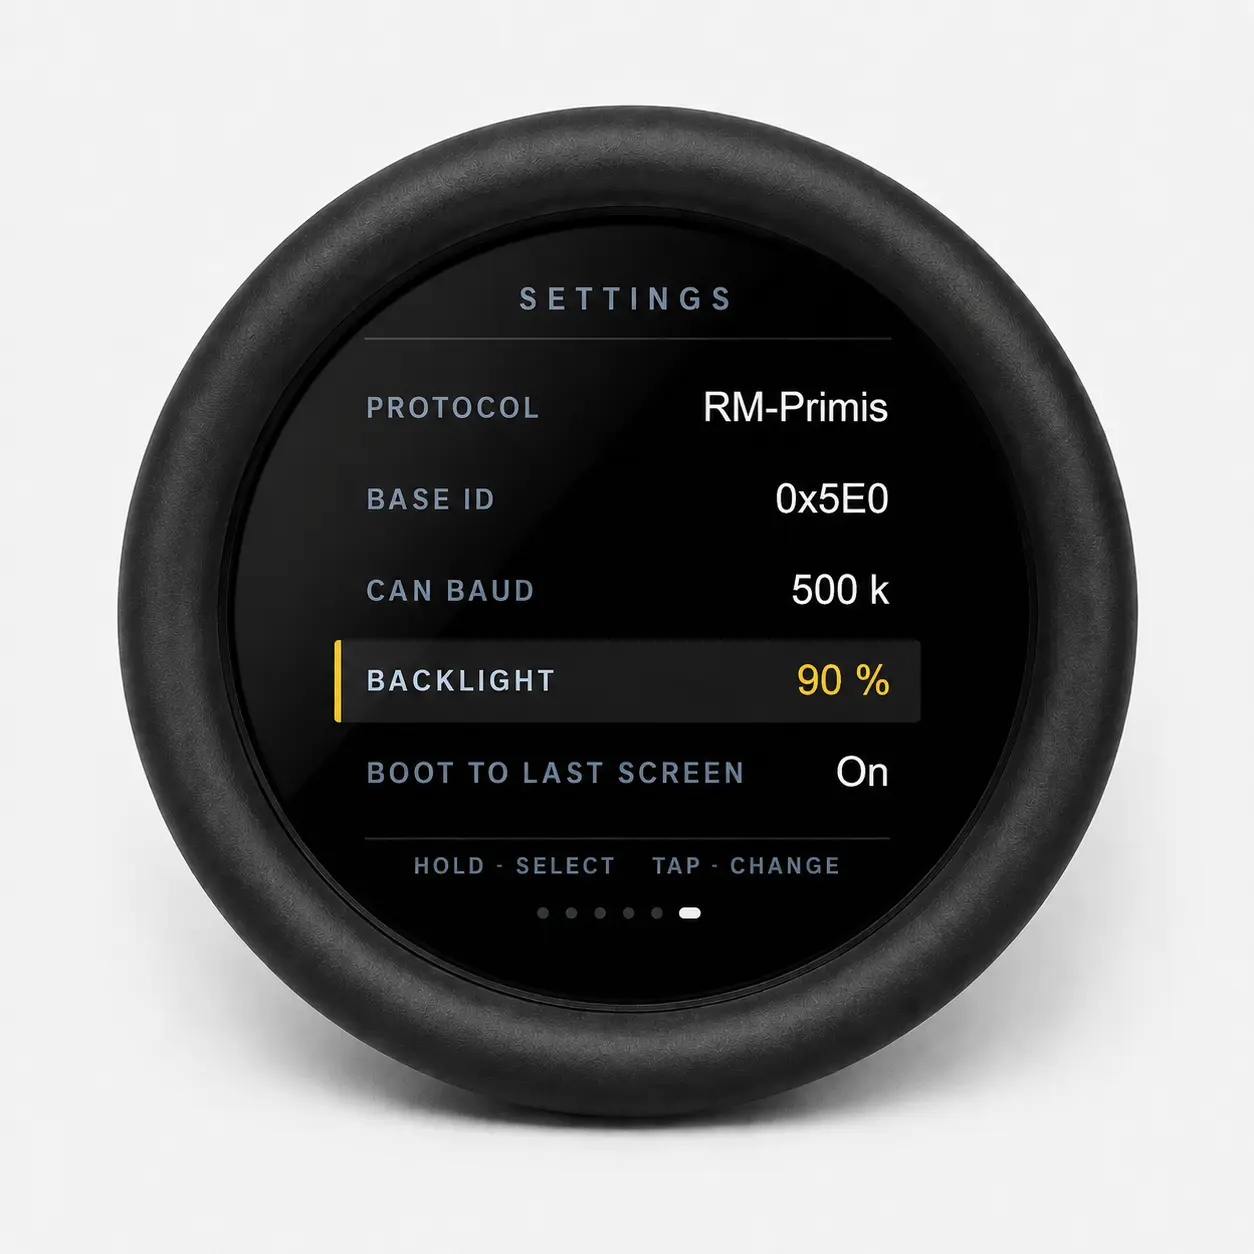
| Setting | What it does |
|---|---|
| Protocol | RM-Primis, MaxxECU, OBDII, or one of your imported DBC files |
| Base ID | The protocol's base CAN identifier, where the protocol allows it to be changed |
| CAN baud | 50 k, 100 k, 125 k, 250 k, 500 k, 800 k, 1 M |
| Backlight | 10 % to 100 % |
| Units | Metric or Imperial — see Units |
| Show lambda as AFR | Air-fuel ratio instead of lambda — see AFR |
| Fuel | Which fuel the AFR figure is calculated for |
| Boot to last screen | Start on the screen you were last using instead of screen 1 |
| Test mode | Feeds simulated values to every channel so you can lay the gauge out on the bench, with no bus connected |
| CAN termination | Switches the internal 120 Ω resistor — see CAN termination |
Use the left side of a row to decrease and the right side to increase.
¶ Units — metric or imperial
The gauge always reads the bus in whatever units your ECU sends. Units only
changes what you are shown, on the gauge and in the app together:
| Channel sends | Imperial shows |
|---|---|
| kPa or bar | psi |
| °C | °F |
| km/h | mph |
| Nm | lb-ft |
Channels with no imperial form — percentages, volts, degrees of ignition
timing, counts — are left exactly as they are.
This works the same way for an imported DBC file. Conversion
is chosen from the unit each channel already carries, so a DBC signal whose unit
is kPa becomes psi for the same reason MAP does, with nothing to set up.
Alarm limits are not affected by this setting. They are stored in the unit
the bus sends and converted only when shown, so switching between metric and
imperial never moves a limit you set. Type a limit in whatever the gauge is
currently showing and it will be right in both.
¶ Lambda as AFR
Show lambda as AFR displays every lambda channel as an air-fuel ratio
instead. It is a separate switch from Units, because AFR is not an
imperial unit — metric and AFR together is a perfectly normal way to work.
It needs one more thing that psi and °F do not: the fuel. Lambda means the
same thing on every fuel, and AFR does not, so the gauge cannot work the AFR out
from the reading alone.
| Fuel | Ratio | 0.85 lambda reads |
|---|---|---|
| Gasoline | 14.7:1 | 12.5 |
| E10 | 14.1:1 | 12.0 |
| E30 | 13.0:1 | 11.1 |
| E85 | 9.8:1 | 8.3 |
| Ethanol (E100) | 9.0:1 | 7.7 |
| Methanol | 6.4:1 | 5.4 |
| Diesel | 14.5:1 | 12.3 |
| LPG | 15.6:1 | 13.3 |
Set the fuel to match what is in the tank. Left on gasoline while running
E85, the AFR figure will read about 50 % high and every judgement made from it
will be wrong. If you are unsure, switch AFR off and read lambda, which is
correct on any fuel.
¶ 6) The Android app
The app is where the gauge is really configured. It talks to the gauge over
Bluetooth LE and writes changes straight into the gauge's memory — they survive
a power cycle, and the phone does not need to stay connected.
Download the Android app: GearDisplay APK
 |
 |
 |
 |
¶ Connecting
- Power the gauge on.
- Open the app and press Connect.
- Grant the Bluetooth permissions Android asks for the first time. Android
requires location permission to be granted for Bluetooth scanning; the app
does not use your location for anything else. - The app finds the gauge (it advertises as GearDisplay), then reads the
whole configuration from it — protocol list, channel list, and what every box
is currently showing. This takes a moment on first connect.
Refresh re-reads everything from the gauge. Use it if you have changed
something on the gauge itself while the app was open.
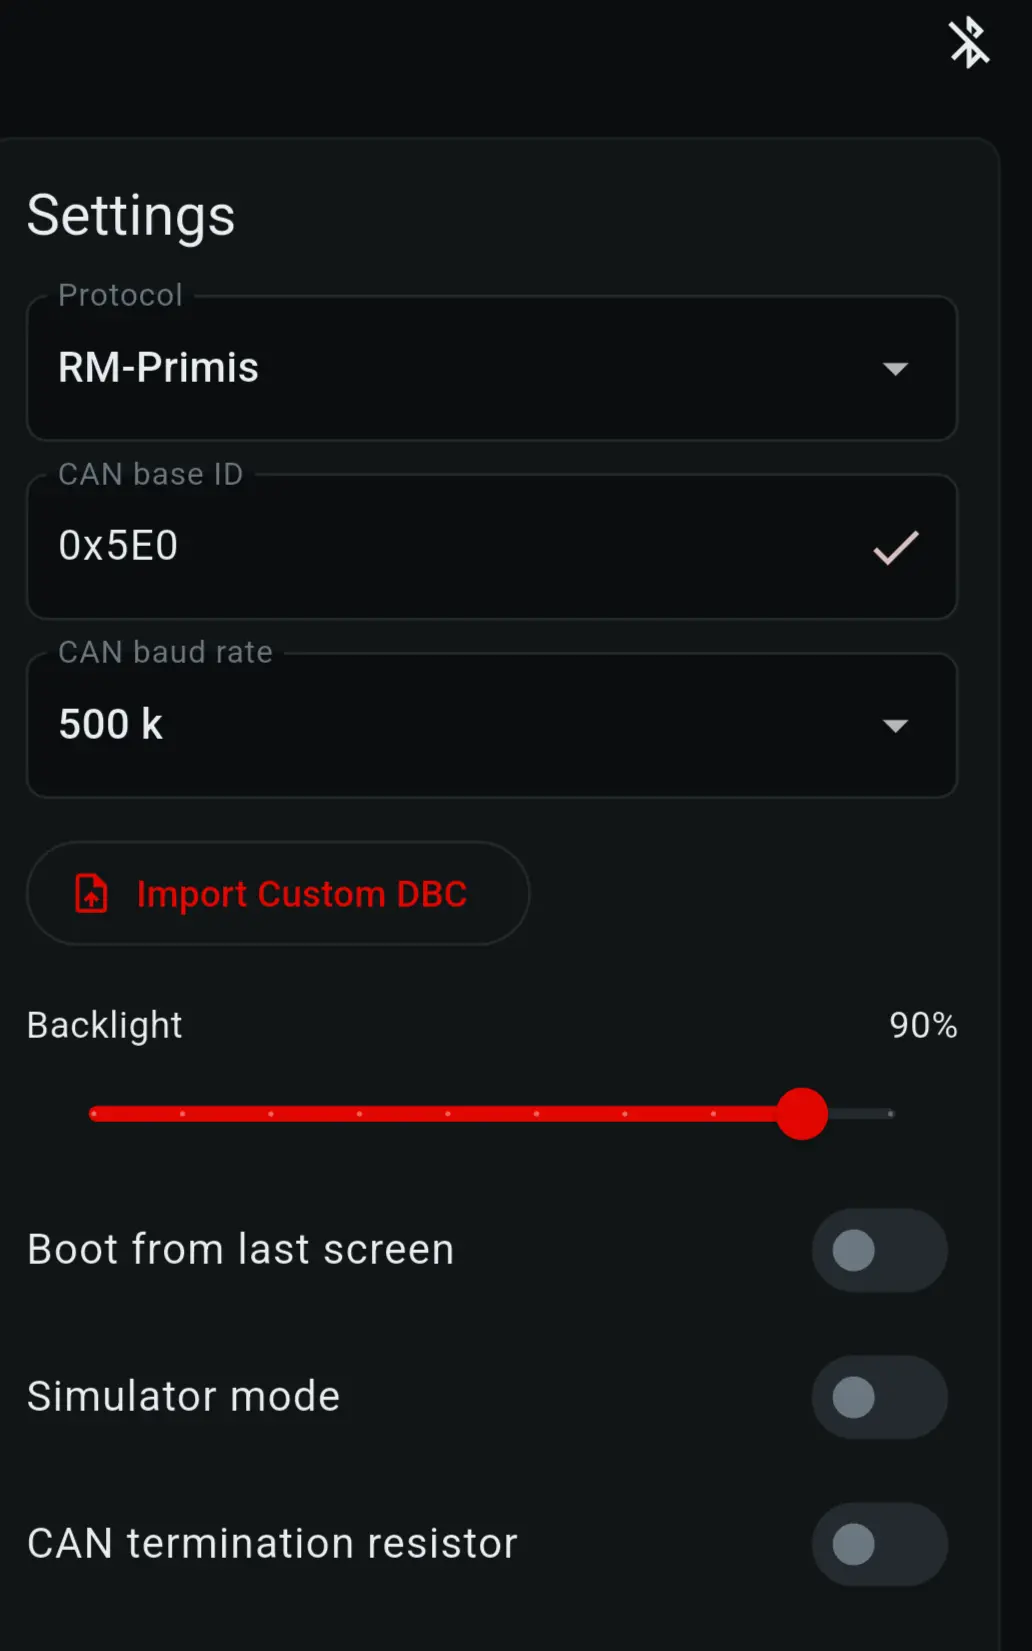
¶ Settings
The same settings as the gauge's own settings screen — protocol, base ID, CAN
baud rate, backlight, boot-to-last-screen, test mode and CAN termination — plus
two things that are only available here:
- Import Custom DBC — see Custom DBC files
- Shift alert — see below
Units sets metric or imperial for the gauge and the app together — see
Units. Show lambda as AFR and Fuel are just below it — see
Lambda as AFR.
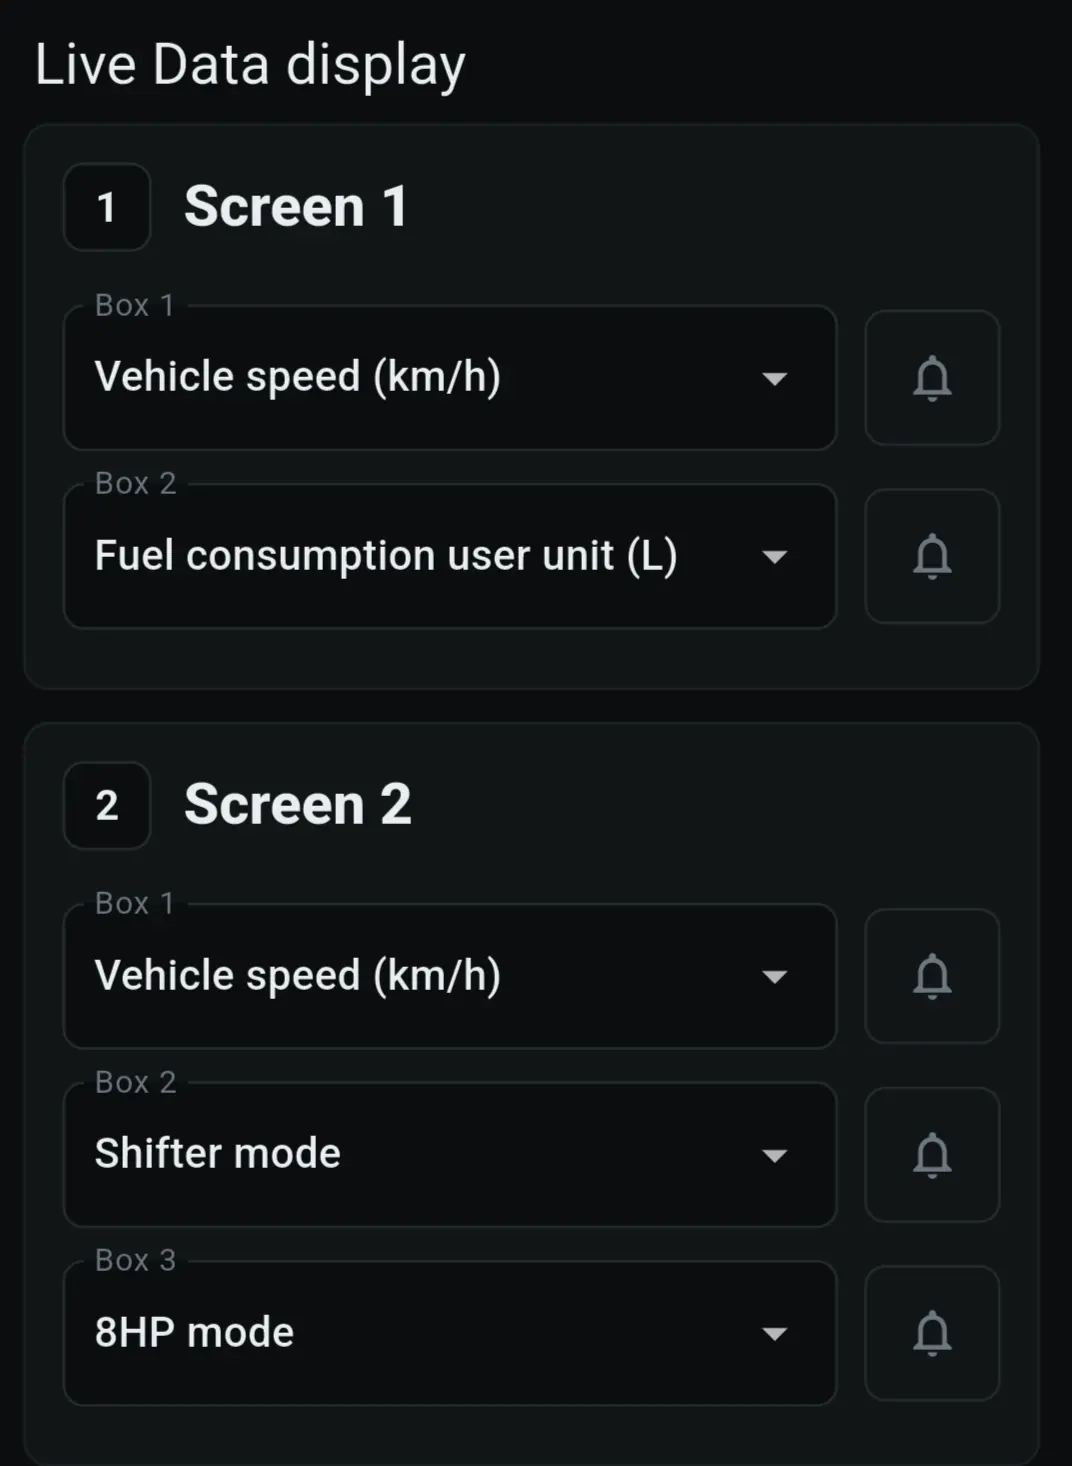
¶ Live Data display
This is the section that decides what every box on the gauge shows. Fields are
grouped by screen, so Screen 1 holds screen 1's two fields, Screen 3
holds its seven, and so on.
Each field is one row:
- A dropdown listing every channel the active protocol provides. Pick one and
the gauge updates immediately. - An alarm button beside it, for that specific channel.
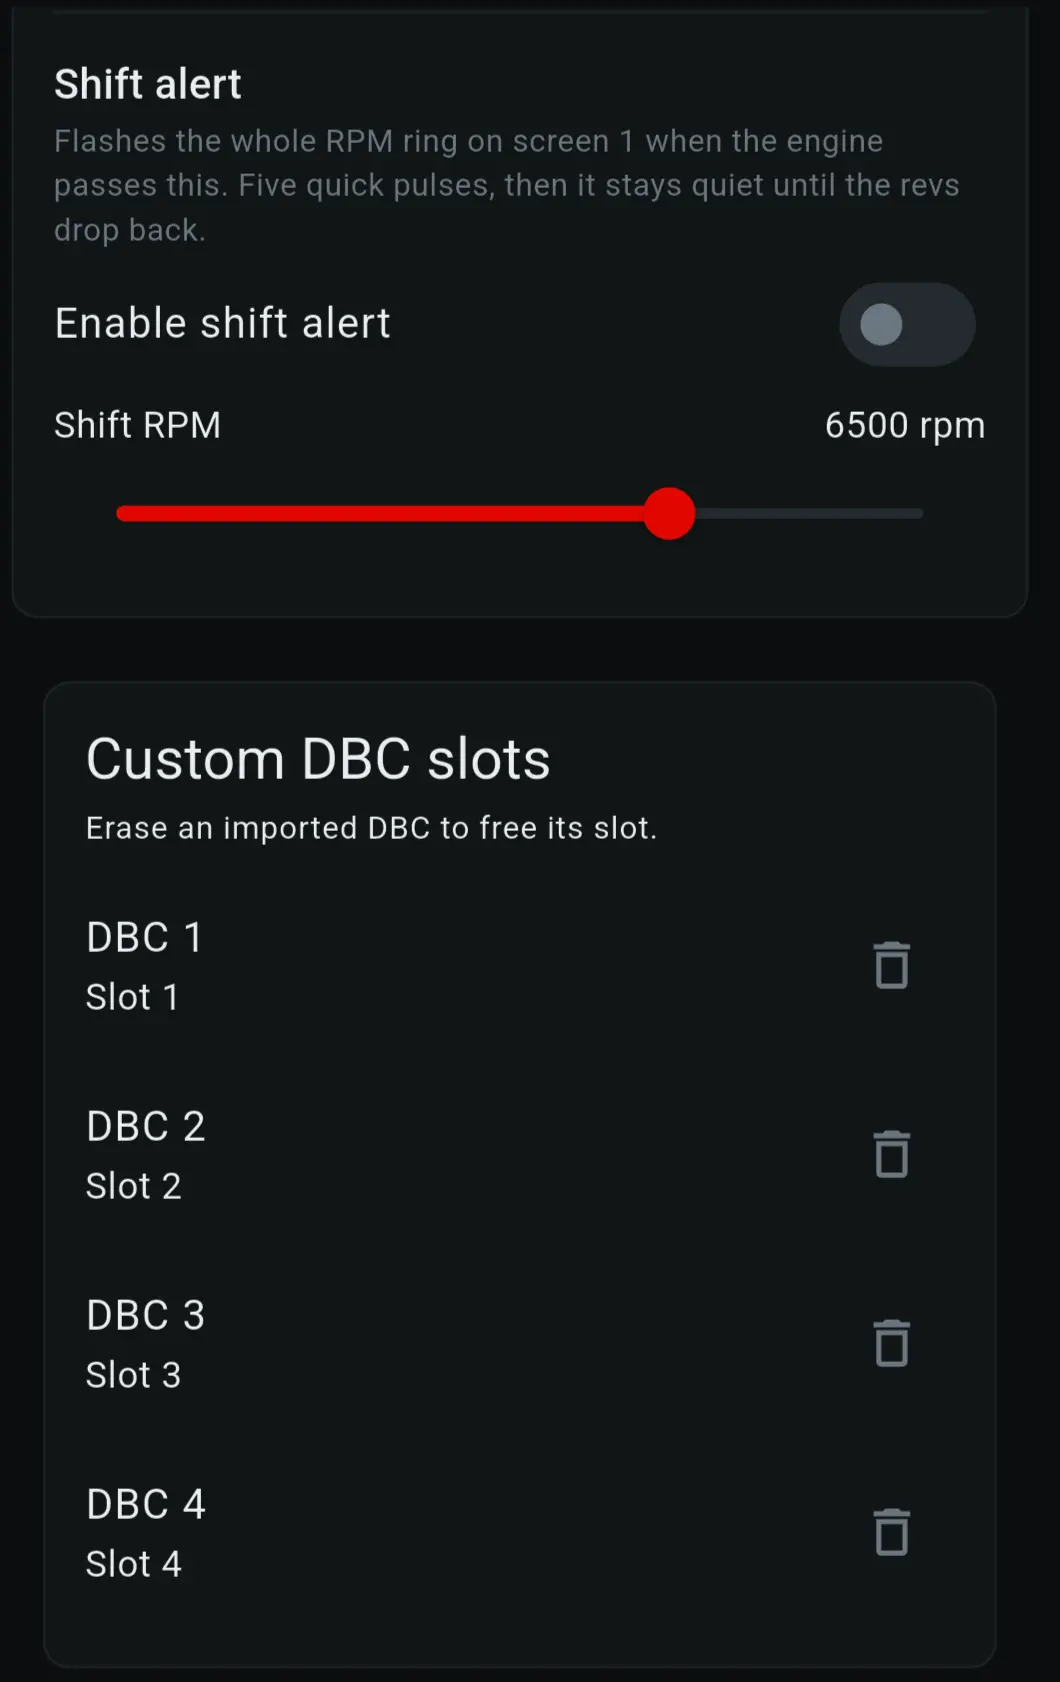
¶ Custom DBC slots
Lists the four DBC slots and lets you erase one to free it up.
¶ 7) Alarms and the shift alert
¶ Alarms
Any displayed value can have a low limit, a high limit, or both. While
the reading is outside those limits, it turns red on the gauge, and it clears
itself as soon as the value comes back into range.
To set one: Live Data display → find the field → press the alarm button beside
its dropdown.
- Low limit — the value goes red below this
- High limit — the value goes red above this
Either can be used on its own. A coolant temperature usually only wants a high
limit; an oil pressure usually only wants a low one.
Press Remove to delete an alarm.
Alarms are optional and are attached to the channel, not the box — so if you
set a high limit on coolant temperature and later move coolant temperature to a
different screen, the alarm moves with it. Up to 16 channels can have alarms
at once.
A channel that has stopped arriving does not trigger its alarm. A missing
signal reads as missing, not as zero, so a dead sensor will not paint the
screen red as though the reading were real.
¶ Shift alert
An optional full-ring flash on screen 1 when the engine passes an RPM you
choose. The whole RPM ring pulses five times, about a third of a second in
total — enough to catch in peripheral vision without pulling your eyes off the
road.
In the app: Settings → Shift alert
- Enable shift alert — on or off
- Shift RPM — the threshold
It rearms once the revs drop back below the threshold, so it fires once per
pull rather than strobing at the limiter.
¶ 8) Supported protocols
Set the protocol in Settings, on the gauge or in the app. Changing it swaps
the entire channel list, and each protocol remembers its own box assignments —
so switching back and forth does not lose your layout.
| Protocol | Base ID | Notes |
|---|---|---|
| RM-Primis | 0x5E0 |
Base ID can be changed |
| MaxxECU | 0x520 |
Fixed |
| OBDII | — | Generic request/response |
| DBC 1 – 4 | — | Your own DBC file, see Custom DBC files |
¶ RM-Primis
The full RM-Primis channel set: engine, fuelling, ignition, boost, VVT, gearbox,
status flags, shift lights and user analog channels. Default base ID 0x5E0,
and the base ID can be changed if your installation uses a different one.
¶ MaxxECU
The MaxxECU broadcast set, including lambda per bank, traction control, knock
detection, accelerometers and the status bits. Base ID 0x520, fixed.
¶ OBDII
Generic OBD-II request/response, for vehicles without a dedicated protocol.
¶ Custom DBC (4 slots)
For anything else. See below.
¶ 9) Custom DBC files
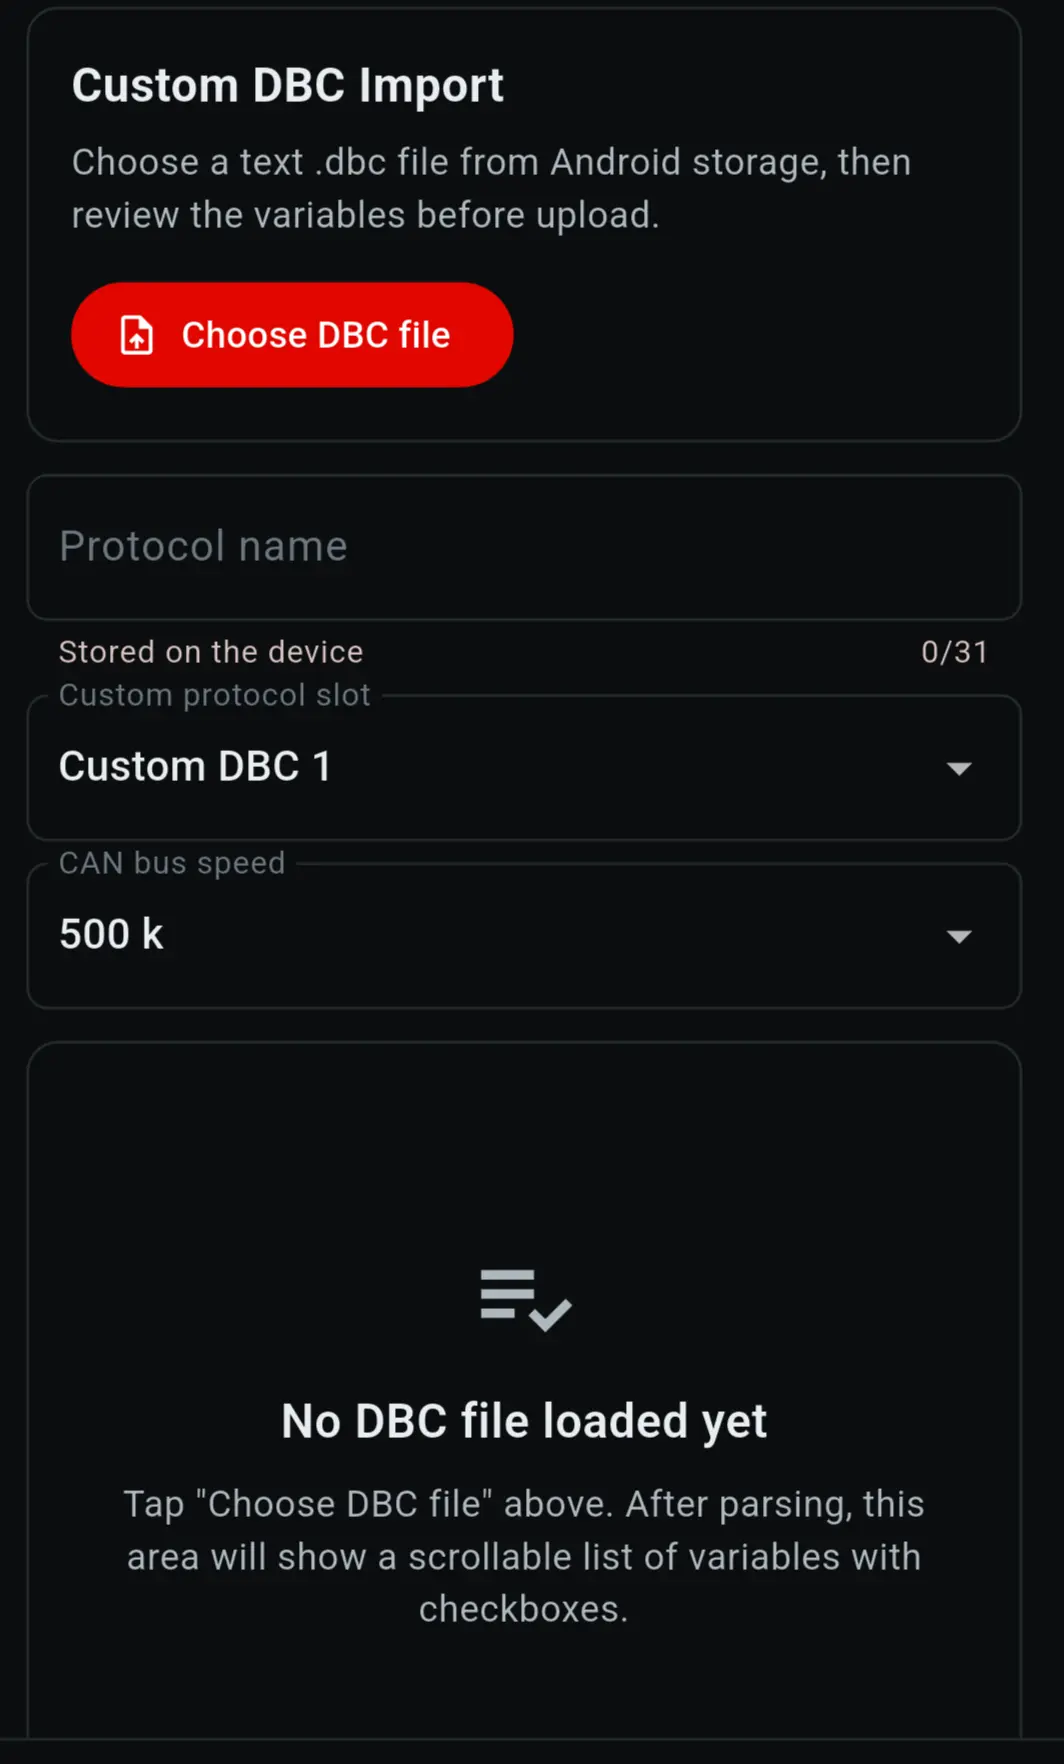
If your ECU is not in the list, you can teach the gauge to read it by importing
its .dbc file — the same file your ECU or logger software uses to describe
its CAN messages.
There are four DBC slots, and each can hold up to 64 signals.
To import one:
- In the app: Settings → Import Custom DBC
- Choose DBC file and pick the
.dbcfrom your phone's storage. - The app parses it and lists every signal it found, grouped by message.
- Tick the signals you want. You do not need all of them — pick the ones you
will actually display. Up to 64 per slot. - Choose which of the four slots to write to.
- Press Upload.
The slot then appears in the protocol list as DBC 1 … DBC 4, and its
signals appear in the channel dropdowns exactly like any built-in protocol.
To free a slot, use Custom DBC slots → erase.
¶ 10) Firmware updates
Firmware is updated over Bluetooth from a Windows PC. Nothing is installed, no
administrator rights are needed, and the gauge does not have to come out of the
dash.
You need two files in the same folder:
| File | Where to get it |
|---|---|
| GearDisplayUpdater.exe | Download the updater |
The firmware (.gdfw) |
Sent to you by RM Racing Electronics |
Then:
- Power the gauge on and leave it showing its normal screens. Keep it within a
few metres of the computer. - Make sure Bluetooth is switched on in Windows.
- Double-click GearDisplayUpdater.exe.
- The firmware file is picked up automatically and the gauge appears in the
list. Press Update my gauge. - Wait. The updater shows how long is left. Leave the gauge powered on the whole
time — it restarts by itself when it is finished.
A failed update cannot damage the gauge. If the update stops part-way, the
gauge keeps the firmware it already had and carries on working. Just run the
updater again.
If an update fails, the updater writes update-log.txt next to itself. Send us
that file and we can see what happened.
¶ 11) Troubleshooting
¶ No data on any screen — every box reads --
Work through it in this order:
- Screen 6 (CAN Monitor). Are any CAN IDs listed?
- Nothing listed → the gauge is not seeing the bus at all. Check the
baud rate first (a mismatch produces exactly this), then CAN‑H / CAN‑L
wiring and whether they are swapped, then the ground connection. - IDs listed but boxes still blank → the bus is fine. The protocol or
base ID is wrong for your ECU.
- Nothing listed → the gauge is not seeing the bus at all. Check the
- Check the error count on screen 6. A rising error count with frames
arriving usually means a termination problem — see below.
¶ Data is intermittent, or the error count climbs
Almost always termination or wiring:
- Is the gauge at the end of the bus, or in the middle? Turn its 120 Ω
resistor on only for the end of the bus, off for the middle. - Is CAN‑H / CAN‑L a twisted pair? Untwisted CAN wiring near ignition coils
or injectors is the usual cause of errors that only appear with the engine
running.
¶ A channel I want is not in the dropdown
The dropdown only lists channels the active protocol provides. Check that the
protocol is right. If your ECU is not one of the built-in protocols, import its
DBC file — see Custom DBC files.
¶ The app cannot find the gauge
- The gauge must be powered on and within range.
- Bluetooth must be on, and the app needs its Bluetooth and location permissions
granted (Android requires location permission for Bluetooth scanning). - If the app connected before and now will not, turn Bluetooth off and on again
on the phone.
¶ A value is red when it should not be
That is an alarm. Open the field's alarm button in the app and
adjust or remove the limits.
¶ I want to check the layout without the car running
Turn on Test mode in Settings. Every channel is fed simulated values, so you
can lay out all five data screens on the bench with nothing connected. Turn it
off before driving — the gauge shows made-up numbers while it is on.
¶ 12) Need help?
Contact customer support at [email protected].
Documentation, the Android app and setup information are all at
docs.rmracingelectronics.com.